
Building Static Lists in SwiftUI
The Ultimate Guide to SwiftUI List Views - Part 1
List views are probably one of the most important UI structures in iOS apps, and you’ll be hard-pressed to find an app that doesn’t use some sort of list.
SwiftUI makes it particularly easy to build list views: it just takes three lines to create a simple list! At the same time, SwiftUI’s List view is extremely powerful and versatile, so it pays off to get to know it in a little bit more detail. In this series, I am going to teach you everything you need to know about List views, from simple lists, styling lists and their items, displaying collections of data in list views, implementing actions on lists and individual list items, to building nested outlines and implementing three-column drill-down navigation UIs that work across iOS, iPadOS, watchOS, and macOS.
Getting Started
Probably the simplest way to build a list is to create a new SwiftUI view and wrap the Hello World text in a List:
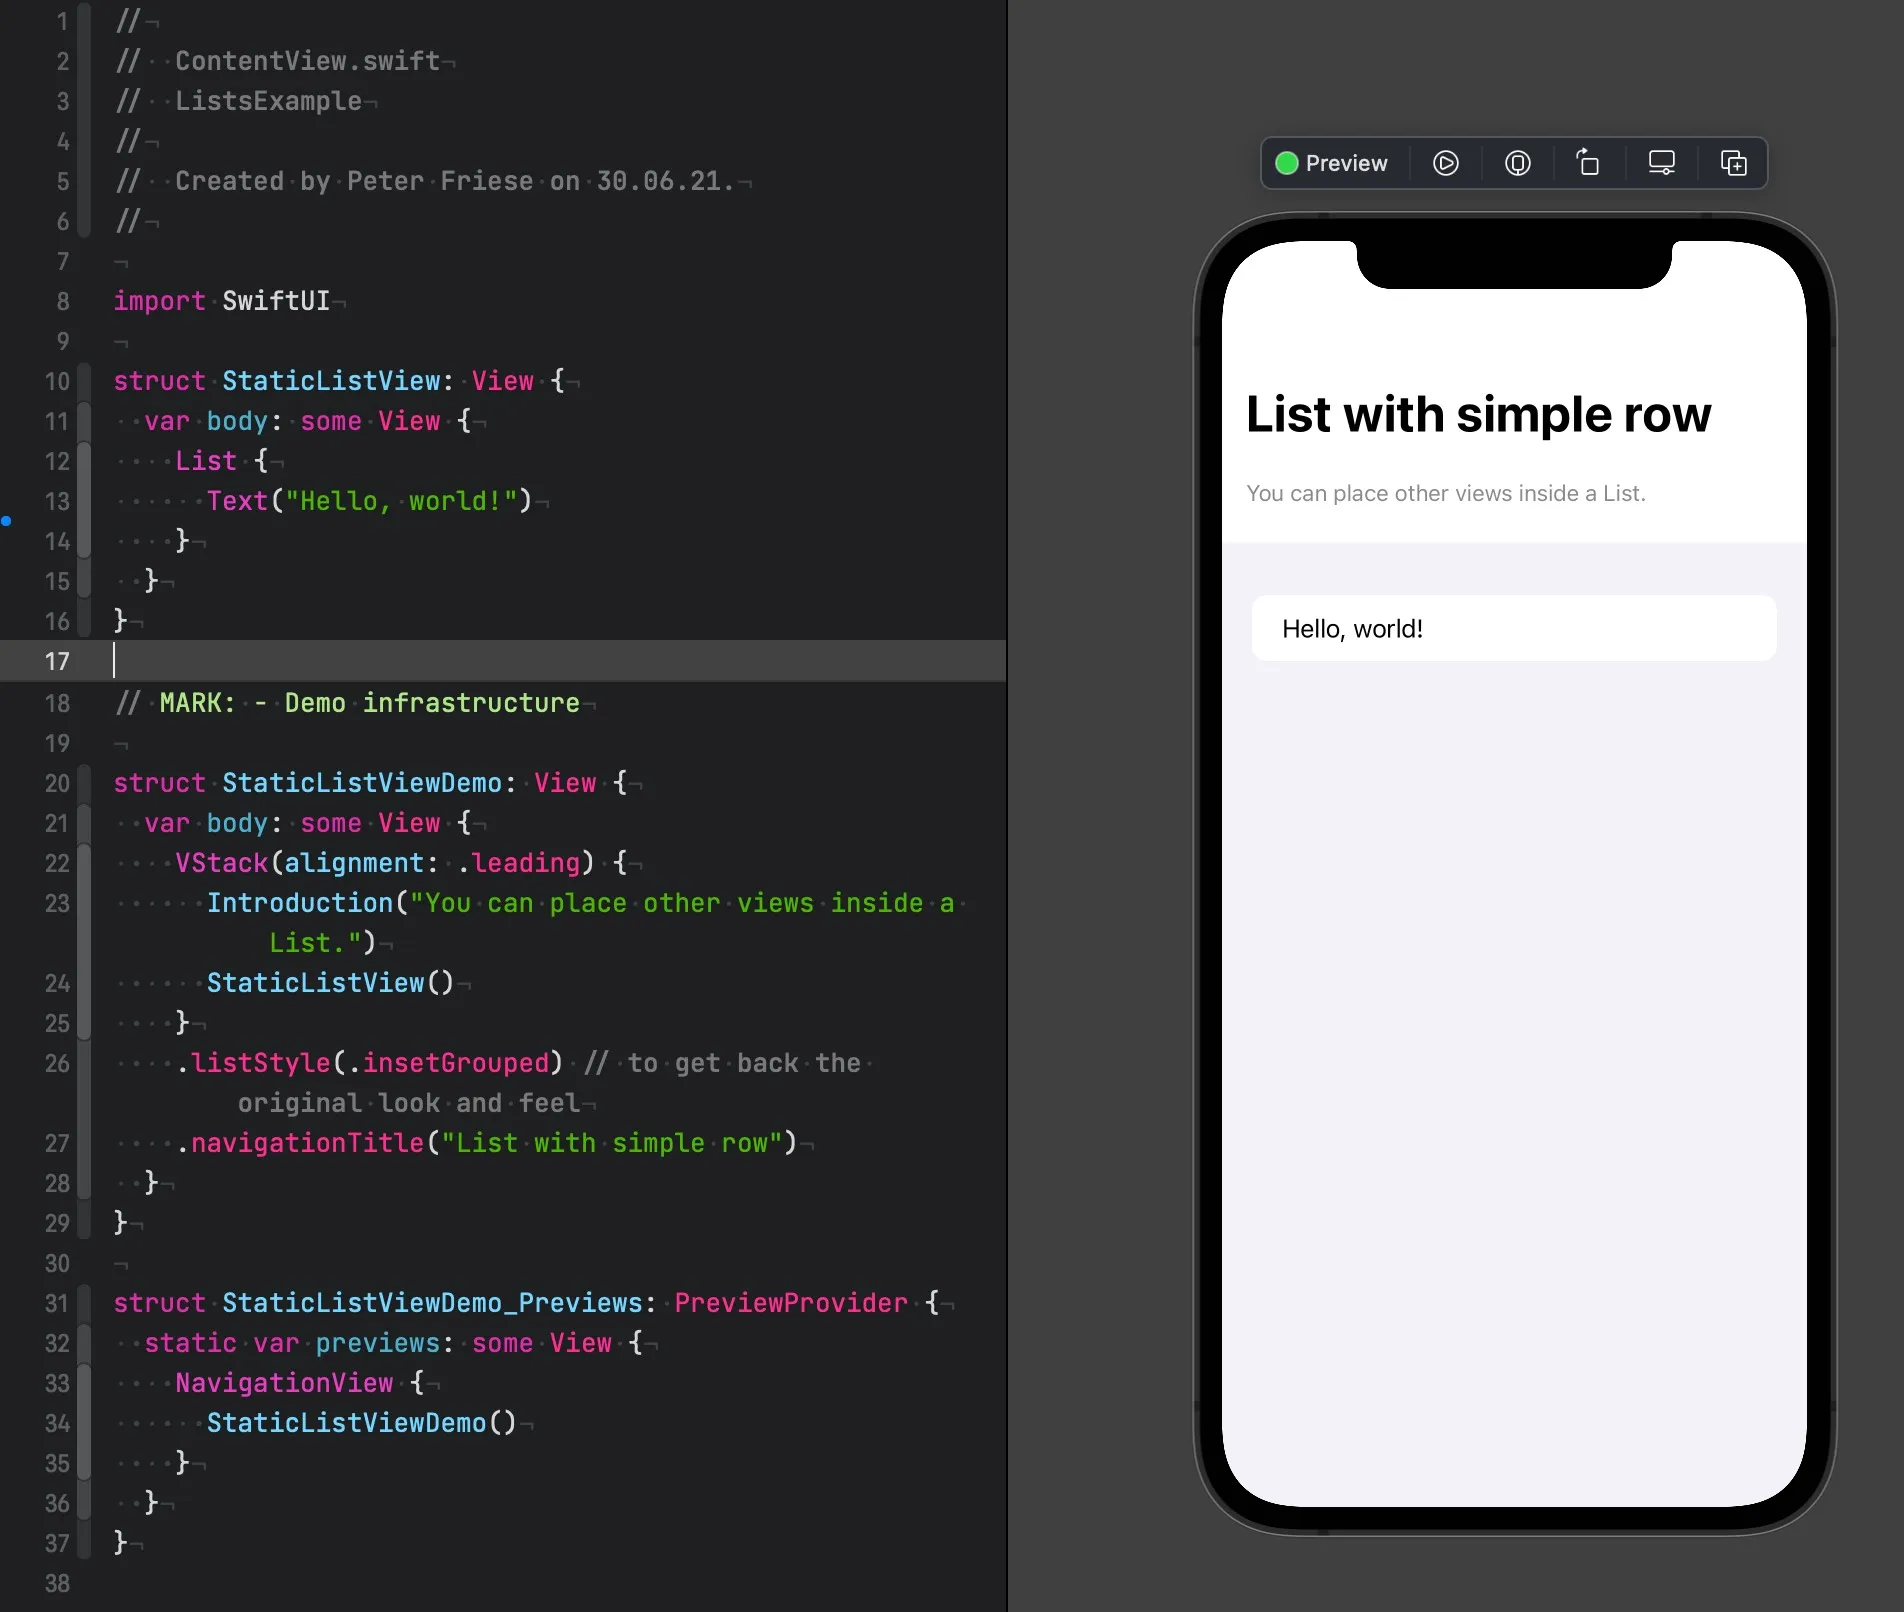
struct StaticListView: View {
  var body: some View {
    List {
      Text("Hello, world!")
    }
  }
}
This will show a static text inside a list view:
To add more items to the list, we can just add another line:
List {
  Text("Hello, world!")
  Text("Hello, SwiftUI!")
}
Using other SwiftUI views inside list rows
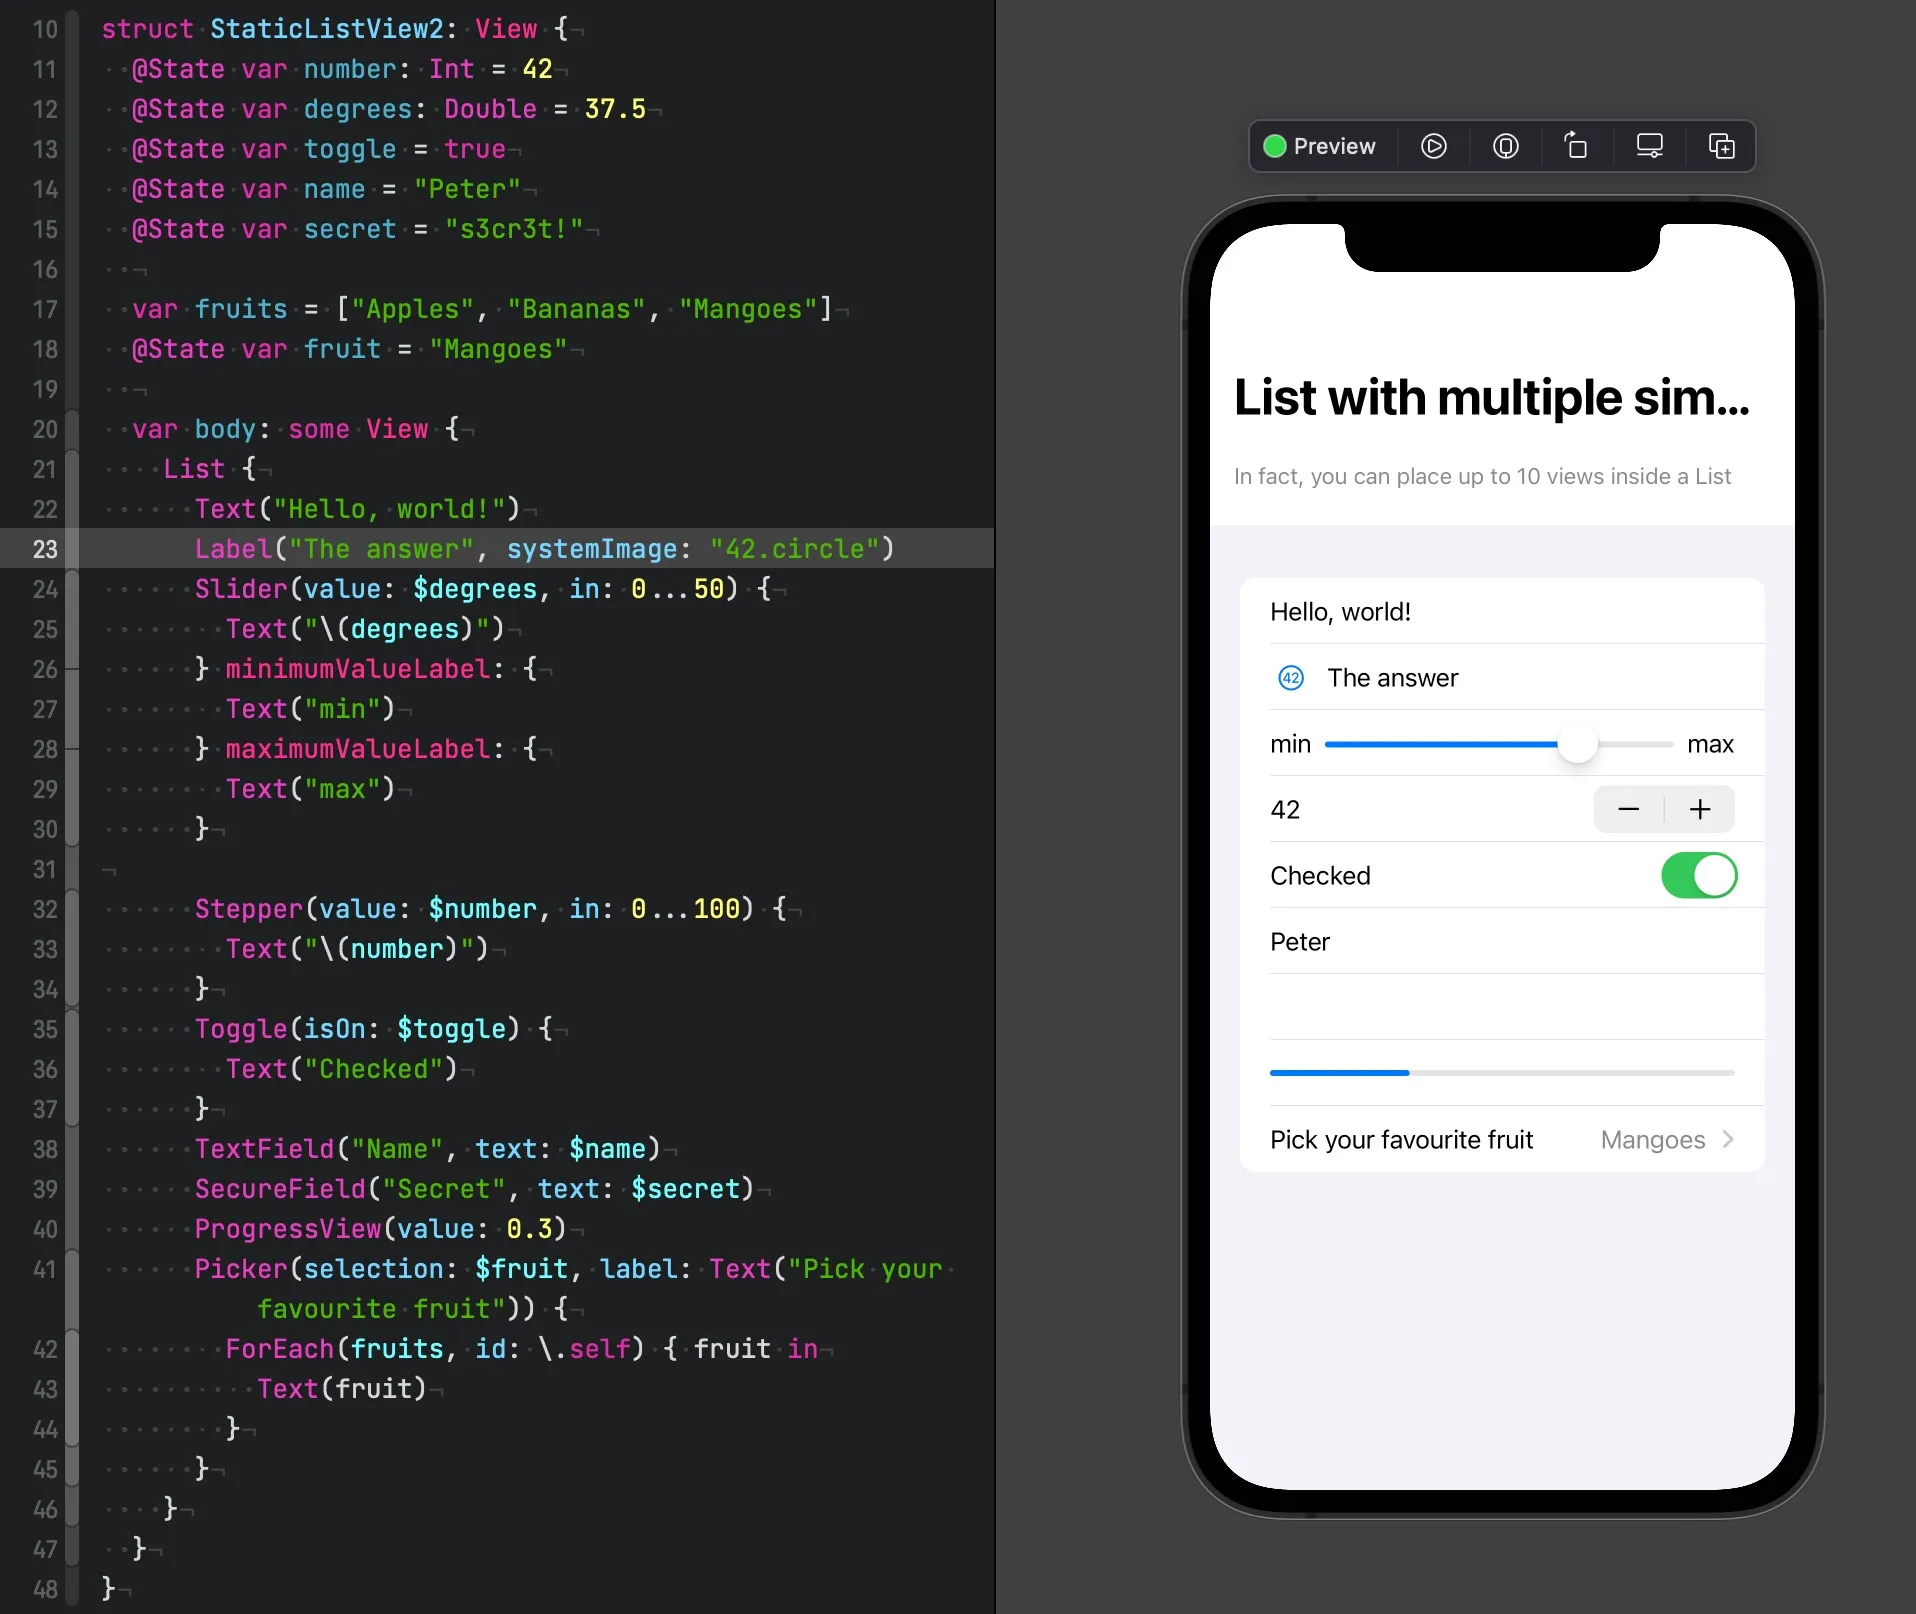
The cool thing about the List view is that you can use any type of SwiftUI view as a list row, not just Text. Labels, Sliders, Steppers, Toggles, TextFields, SecureFields for entering passwords, ProgressViews, and Pickers - you name it.
struct StaticListView2: View {
  @State var number: Int = 42
  @State var degrees: Double = 37.5
  @State var toggle = true
  @State var name = "Peter"
  @State var secret = "s3cr3t!"

  var fruits = ["Apples", "Bananas", "Mangoes"]
  @State var fruit = "Mangoes"

  var body: some View {
    List {
      Text("Hello, world!")
      Label("The answer", systemImage: "42.circle")
      Slider(value: $degrees, in: 0...50) {
        Text("\(degrees)")
      } minimumValueLabel: {
        Text("min")
      } maximumValueLabel: {
        Text("max")
      }

      Stepper(value: $number, in: 0...100) {
        Text("\(number)")
      }
      Toggle(isOn: $toggle) {
        Text("Checked")
      }
      TextField("Name", text: $name)
      SecureField("Secret", text: $secret)
      ProgressView(value: 0.3)
      Picker(selection: $fruit, label: Text("Pick your favourite fruit")) {
        ForEach(fruits, id: \.self) { fruit in
          Text(fruit)
        }
      }
    }
  }
}
Building Custom List Rows
And - thanks to SwiftUI’s stack-based layout system, you can easily create custom rows as well. In this example, we’re using VStack to layout two Text views in a vertical stack, replicating the typical title and details layout that is widely used in many iOS apps.
struct StaticListWithSimpleCustomRowView: View {
  var body: some View {
    List {
      VStack(alignment: .leading) {
        Text("Apples")
          .font(.headline)
        Text("Eat one a day")
          .font(.subheadline)
      }
      VStack(alignment: .leading) {
        Text("Bananas")
          .font(.headline)
        Text("High in potassium")
          .font(.subheadline)
      }
    }
  }
}
Adding custom rows like this is quick and easy, but the code will grow rapidly as we add more rows, and this will make it harder to understand and update it when we need to make changes. To prevent this from happening, we can extract the code for the list rows into a separate view, making it reusable:
struct StaticListWithSimpleCustomRowView: View {
  var body: some View {
    List {
      CustomRowView(title: "Apples", subtitle: "Eat one a day")
      CustomRowView(title: "Bananas", subtitle: "High in potassium")
    }
  }
}

private struct CustomRowView: View {
  var title: String
  var subtitle: String

  var body: some View {
    VStack(alignment: .leading) {
      Text(title)
        .font(.headline)
      Text(subtitle)
        .font(.subheadline)
    }
  }
}
To learn more about refactoring SwiftUI code, check out this video in which I show the process of refactoring SwiftUI views in more detail:
More Complex List Rows
SwiftUI’s layout system is both flexible and easy to use, and makes it easy to create even complex layouts using a combination of HStack, VStack, ZStack, and other SwiftUI views. Here is how you can create list rows with a title, a subtitle, a leading image, and a trailing number:
struct StaticListWithCustomRowView: View {
  var body: some View {
    List {
      CustomRowView("Apple", description: "Eat one a day", titleIcon: "🍏", count: 2)
      CustomRowView("Banana", description: "High in potassium", titleIcon: "🍌", count: 3)
      CustomRowView("Mango", description: "Soft and sweet", titleIcon: "🥭")
    }
  }
}

private struct CustomRowView: View {
  var title: String
  var description: String?
  var titleIcon: String
  var count: Int

  init(_ title: String, description: String? = nil, titleIcon: String, count: Int = 1) {
    self.title = title
    self.description = description
    self.titleIcon = titleIcon
    self.count = count
  }

  var body: some View {
    HStack {
      Text(titleIcon)
        .font(.title)
        .padding(4)
        .background(Color(UIColor.tertiarySystemFill))
        .cornerRadius(10)
      VStack(alignment: .leading) {
        Text(title)
          .font(.headline)
        if let description = description {
          Text(description)
            .font(.subheadline)
        }
      }
      Spacer()
      Text("\(count)")
        .font(.title)
    }
  }
}
Notice how we made use of a custom initialiser for CustomRowView, allowing us to get rid of the parameter name for the title property, and to define defaults for some of the properties. As a result, it is now more convenient to use the custom row view.
Conclusion
Lists are a very popular UI element in iOS apps, and thanks to SwiftUI’s declarative syntax, it’s easier than ever before to quickly build rich list UIs.
In the next part of this series, we will look into displaying data from a collection in a list.
Feel free to connect with me on Twitter, and if you have any questions or remarks, don’t hesitate to send a tweet or DM.
Thanks for reading, and stay tuned for the next episode! 🔥
Agentic Coding in Xcode with Gemini CLI
Build apps with AI assistance in Xcode using Gemini CLI

Turn Your Photos Into Miniature Magic with Nano Banana
Build stunning image generation apps in iOS with just a few lines of Swift

Reverse-Engineering Xcode's Coding Intelligence prompt
A look under the hood
Extracting structured data from PDFs using Gemini 2.0 and Genkit
Understanding SwiftUI Preferences
SwiftUI Parent / Child View Communication